
Transform your wedding decor on a budget with these clever hacks. Create stunning DIY floral centerpieces using in-season blooms. Turn glass jars into enchanting luminaries for a romantic ambiance. Craft elegant paper napkin rings and personalized place cards with faux calligraphy. Repurpose an old window frame as a unique seating chart. Paint wine bottles for chic vases, and customize favor boxes for a special touch. Handcraft table runners to add elegance, and embellish champagne flutes for a glamorous toast. Don't forget a balloon garland photo backdrop for Instagram-worthy memories. These genius ideas will elevate your wedding without breaking the bank.
Key Takeaways
- Transform wine bottles into elegant painted vases for centerpieces, using acrylic paint and various bottle shapes for visual interest.
- Create DIY floral centerpieces using in-season flowers and fillers, varying heights for a luxurious appearance at a fraction of the cost.
- Craft personalized napkin rings from cardboard tubes and decorative paper, doubling as place cards for an elegant table setting.
- Upcycle glass jars into luminaries with paint and candles, arranging them creatively for a romantic and budget-friendly ambiance.
- Design a balloon garland photo backdrop using various sizes of balloons in wedding colors, adding foliage or ribbons for depth.
DIY Floral Centerpieces
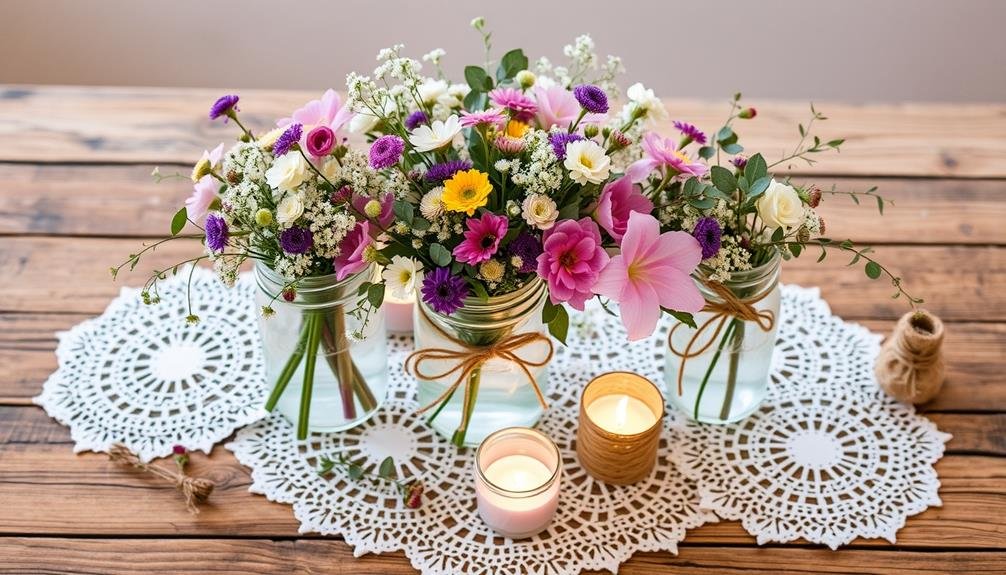
For stunning yet budget-friendly wedding decor, DIY floral centerpieces are a perfect choice. You'll save a fortune by creating your own arrangements, and you'll have full control over the design.
Start by selecting in-season flowers from local markets or wholesalers to keep costs down. Mix high-end blooms with less expensive filler flowers for a luxurious look without breaking the bank.
Invest in a few key supplies like floral foam, wire cutters, and clear vases from dollar stores. You can elevate simple glass containers by wrapping them with lace, burlap, or ribbon. For a rustic touch, use mason jars or repurposed tin cans painted in your wedding colors.
Create depth and interest by varying the heights of your arrangements. Incorporate candles, greenery, or non-floral elements like branches or fruits to add texture and reduce flower costs.
Don't forget to practice your designs well in advance to perfect your technique and timing.
Consider making larger statement pieces for key areas and simpler arrangements for guest tables. This approach allows you to maximize impact while managing your budget effectively.
With creativity and planning, your DIY floral centerpieces will look professionally crafted at a fraction of the cost.
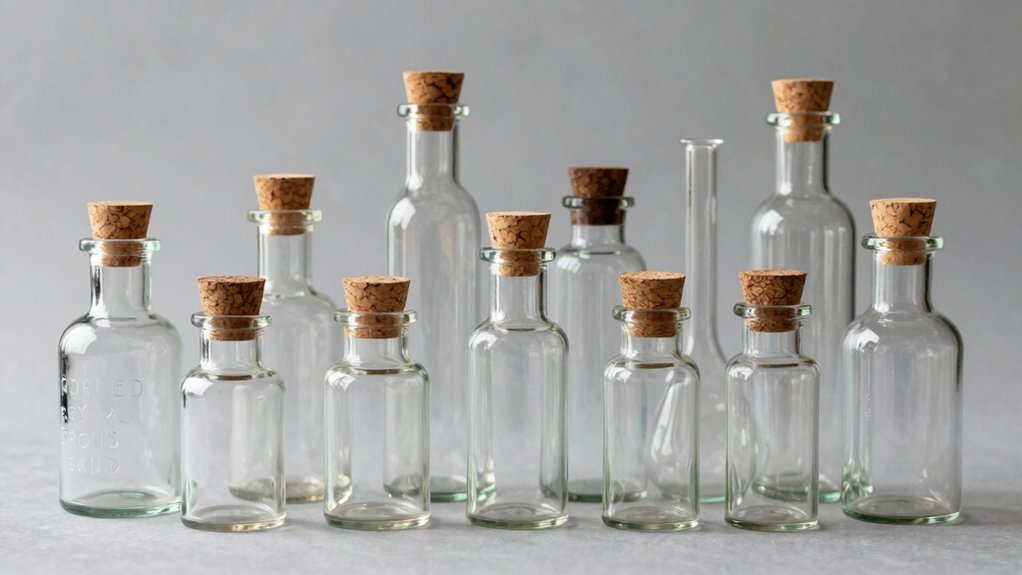
Upcycled Glass Jar Luminaries
Transform ordinary glass jars into enchanting luminaries for your wedding with this simple upcycling hack. Start by collecting various glass jars, such as mason jars, pasta sauce jars, or pickle jars. Clean them thoroughly and remove any labels. Next, decide on your design – you can create intricate patterns or simple shapes using paint or adhesive stencils.
For a frosted look, spray the jars with frosted glass spray paint. Alternatively, use acrylic paint or glass paint markers to add color and designs. Once your design is complete, place a tea light or battery-operated LED candle inside each jar for a magical glow.
Here's a quick guide to different luminary styles you can create:
| Style | Paint Type | Design Method | Effect |
|---|---|---|---|
| Rustic | Chalk paint | Freehand | Vintage charm |
| Elegant | Metallic paint | Stencils | Sophisticated |
| Whimsical | Glass markers | Dots/swirls | Playful |
| Minimalist | Frosted spray | Tape patterns | Modern, sleek |
Arrange these luminaries along walkways, on tables, or hang them from tree branches to create a romantic ambiance. You'll have stunning, personalized decor that looks expensive but costs very little.
Elegant Paper Napkin Rings
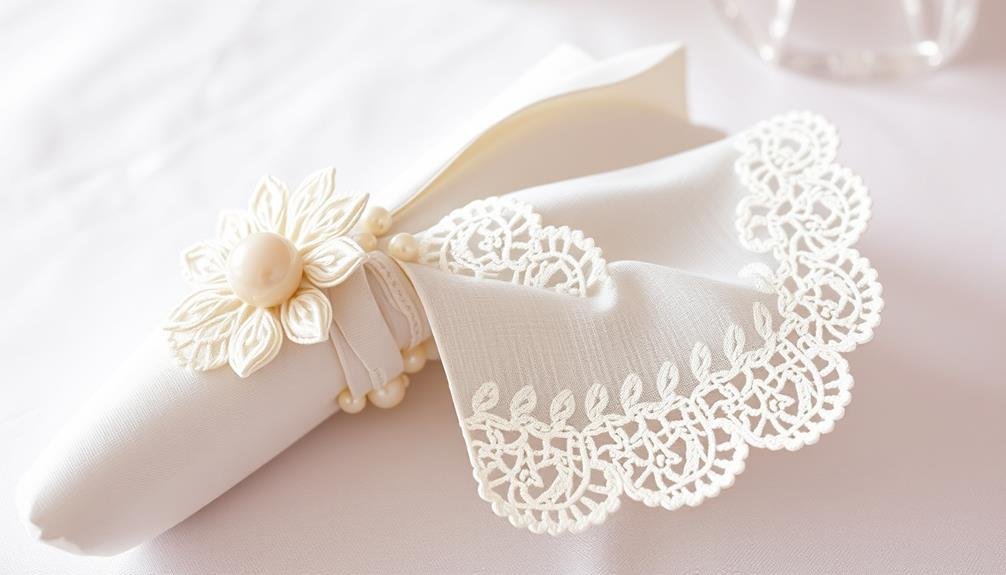
Moving from lighting to table decor, let's explore another budget-friendly wedding accessory hack. Elegant paper napkin rings can add a touch of sophistication to your table settings without breaking the bank.
You'll need cardboard tubes from paper towel or toilet paper rolls, decorative paper, glue, and scissors to create these stunning accessories.
Start by cutting the cardboard tubes into 1-inch wide rings. Next, measure and cut strips of decorative paper slightly wider than the rings. Wrap the paper around each ring, securing it with glue. For a polished look, fold the excess paper inside the ring and glue it down.
Get creative with your paper choices. Use metallic papers for a glamorous touch, floral patterns for a romantic feel, or solid colors that match your wedding theme.
You can even personalize the rings by adding small embellishments like ribbon, lace, or tiny artificial flowers.
For an extra special touch, consider printing your guests' names on the paper before wrapping the rings. This dual-purpose accessory will serve as both a napkin ring and a place card, saving you money on separate place cards.
Faux Calligraphy Place Cards
Calligraphy adds an elegant touch to wedding stationery, but professional calligraphers can be expensive. You can achieve a similar look with faux calligraphy place cards, saving money without sacrificing style.
Start by choosing high-quality cardstock in your wedding colors. Use a pencil to write each guest's name in cursive, leaving extra space between letters. Trace over the pencil with a fine-tipped black pen, creating thicker downstrokes where you'd normally apply pressure with a calligraphy pen.
To add depth, use a brush pen or marker to fill in the downstrokes, creating the illusion of varying line weights. For a metallic touch, try a gold or silver paint pen. Practice on scrap paper before tackling your final place cards. Don't forget to erase any visible pencil marks.
For an extra flourish, add small designs like leaves, flowers, or swirls around the names. You can also incorporate watercolor washes or ombré effects for a more artistic look.
Display your handmade place cards in mini easels, tucked into napkin folds, or propped against small succulent favors for a Pinterest-worthy tablescape that won't break the bank.
Repurposed Window Frame Seating Chart
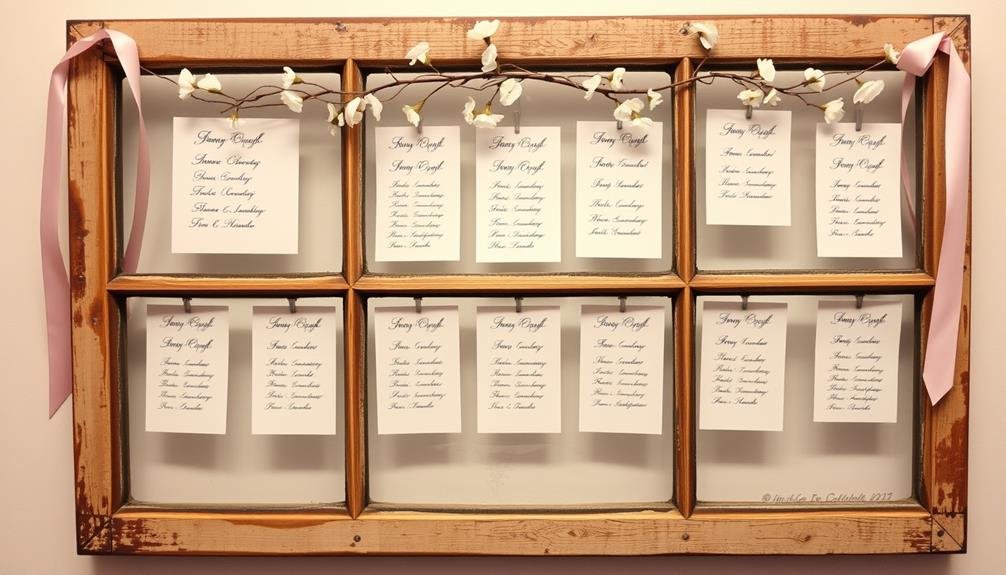
A repurposed window frame can serve as a unique and eye-catching seating chart for your wedding. This DIY project combines vintage charm with practicality, creating a display that's both functional and aesthetically pleasing. To create your own, start by sourcing an old window frame from a flea market, antique store, or salvage yard.
Clean the frame thoroughly and apply a fresh coat of paint if desired. Use a glass etching kit or vinyl decals to add table numbers and guest names to each pane. If the glass is missing, replace it with chicken wire or twine to create a rustic look. Attach place cards with mini clothespins or ribbons.
Here's a breakdown of materials and estimated costs:
| Item | Estimated Cost | Where to Find |
|---|---|---|
| Window Frame | $10-$30 | Flea Market |
| Paint | $5-$15 | Hardware Store |
| Etching Kit | $10-$20 | Craft Store |
| Clothespins | $2-$5 | Dollar Store |
Display your finished seating chart on an easel or prop it against a wall at your reception entrance. This personalized touch will impress your guests and serve as a conversation starter. Plus, you'll have a unique keepsake to display in your home after the wedding.
Balloon Garland Photo Backdrop
While a seating chart guides guests to their tables, a balloon garland photo backdrop creates a stunning visual for capturing memories. You can craft this eye-catching feature without breaking the bank.
Start by purchasing a variety of balloons in your wedding colors, including different sizes and finishes like matte, metallic, and clear. You'll also need fishing line, a balloon pump, and command hooks.
Begin by inflating the balloons to various sizes, creating visual interest. Thread the fishing line through the balloon knots, alternating colors and sizes as you go. Secure the ends of the fishing line to command hooks on the wall or a freestanding frame. Layer additional balloons onto the initial structure, filling in gaps and creating depth. Add foliage, flowers, or ribbons for extra flair.
For a more organic look, use a chicken wire base and attach balloons with glue dots. This method allows for more flexibility in shaping your garland.
Don't forget to incorporate your wedding hashtag or initials using oversized letter balloons or a neon sign. Your DIY balloon garland will serve as a beautiful, budget-friendly focal point for photos throughout your special day.
Painted Wine Bottle Vases
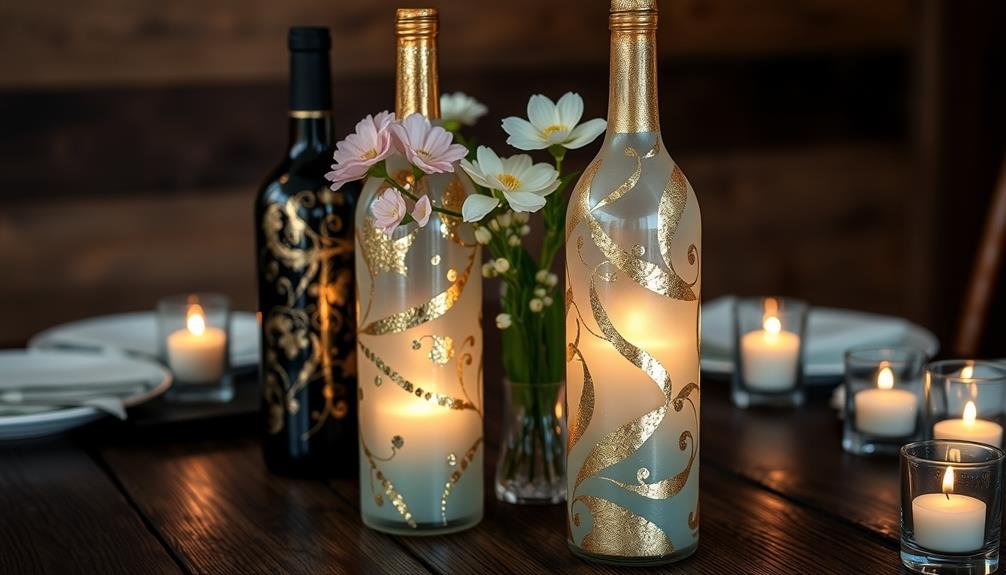
Transform ordinary wine bottles into stunning wedding centerpieces with these painted vase hacks.
You'll learn how to select the perfect bottles, choose and apply the right paints, and create eye-catching arrangements.
These DIY vases will add a personalized touch to your reception tables while saving you money on floral decor.
Choosing the Right Bottles
Selecting the perfect bottles for your painted wine bottle vases is essential to achieving the desired aesthetic for your wedding decor. Consider the shape, size, and color of the bottles to complement your overall theme. Opt for a mix of tall and short bottles to create visual interest, and choose clear glass for lighter paint colors or dark bottles for bolder hues.
When sourcing bottles, don't limit yourself to wine. Champagne, liquor, and even specialty soda bottles can add unique shapes to your collection. Ask friends and family to save their empties, or check with local restaurants and bars for donations. Remember to thoroughly clean and remove labels before painting.
Here's a guide to help you choose the right bottles:
| Bottle Type | Best For | Paint Technique |
|---|---|---|
| Wine | Tall centerpieces | Solid or ombre |
| Champagne | Elegant displays | Metallic accents |
| Liquor | Rustic charm | Distressed look |
| Beer | Casual arrangements | Textured patterns |
| Soda | Eclectic mix | Glitter or sparkle |
Paint Selection and Application
Once you've chosen your bottles, it's time to select the right paint and apply it effectively. Opt for acrylic paint designed for glass surfaces, as it adheres well and provides excellent coverage. Choose colors that complement your wedding theme or venue decor. For a metallic finish, look for specialized metallic paints that create a luxurious sheen.
Before painting, clean the bottles thoroughly with rubbing alcohol to remove any residue. Apply painter's tape to create clean edges or patterns if desired. Start with a thin, even coat of paint using a foam brush for smooth application. Allow each layer to dry completely before adding another coat. Most bottles will require 2-3 coats for ideal coverage.
For a distressed look, lightly sand some areas after the paint has dried. To add texture, mix sand or glitter into the paint before applying.
Once you're satisfied with the coverage, seal the paint with a clear, water-resistant sealant to protect it from moisture and extend its longevity. This step is vital if you plan to use the bottles as vases with water. Allow the sealant to dry completely before handling or decorating further.
Arranging and Displaying Vases
Now that your painted wine bottle vases are ready, it's time to arrange and display them for maximum impact at your wedding. Start by grouping the bottles in odd numbers, such as three or five, as this creates a more visually appealing arrangement. Vary the heights of the bottles within each group to add depth and interest.
Consider the color palette you've chosen for your painted bottles and how it complements your wedding decor. Place them strategically throughout your venue, focusing on high-visibility areas like the reception tables, gift table, or bar.
For centerpieces, surround the bottles with smaller decorative elements like tea lights, scattered petals, or small ornaments that match your theme.
If you're using the bottles as aisle markers, secure them with twine or ribbon to shepherd's hooks or chair backs. For a cohesive look, repeat the same arrangement style at regular intervals.
Don't forget to fill the bottles with appropriate flowers or greenery that complement your wedding colors. Simple, long-stemmed flowers like baby's breath or eucalyptus branches can create a stunning effect without overshadowing your DIY vases.
Customized Favor Boxes
Customized favor boxes offer a personal touch to your wedding gifts. You don't need to spend a fortune to create unique and memorable packaging for your guests' favors.
Start with plain, inexpensive cardboard boxes from a craft store or online supplier. Transform them with creative DIY techniques that match your wedding theme.
Use stamps or stencils to add patterns or monograms to the boxes. You can create custom rubber stamps with your initials or wedding date for a fraction of the cost of pre-printed boxes.
Alternatively, wrap the boxes in leftover wrapping paper, fabric scraps, or even pages from old books for a vintage look.
Enhance the boxes with ribbons, twine, or lace you already have. Add small embellishments like faux flowers, buttons, or seashells to tie them into your overall decor.
For a rustic touch, use kraft paper and tie with raffia or jute string. Don't forget to include a personalized tag with each box – you can easily print these at home on cardstock.
Handcrafted Table Runners
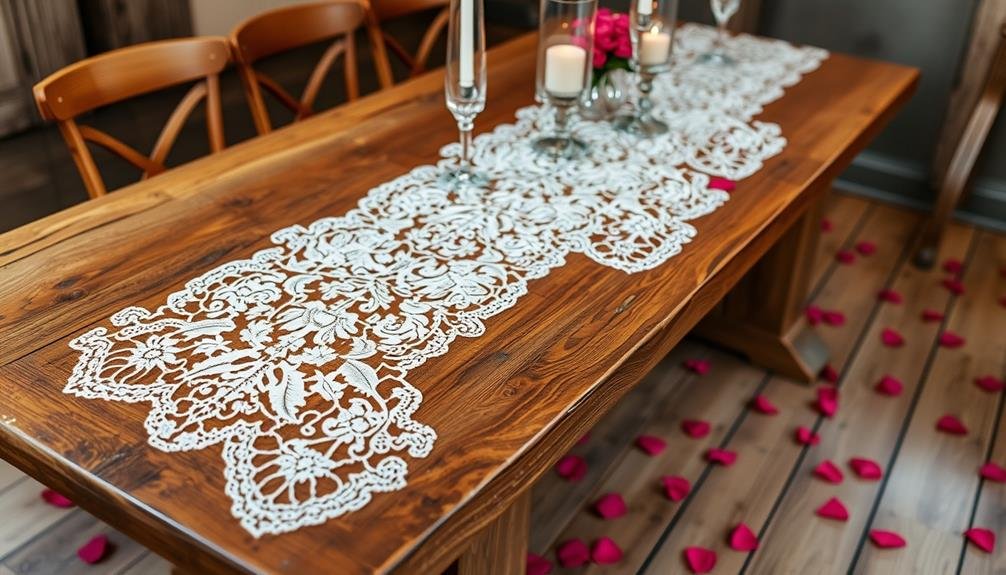
For a budget-friendly yet elegant touch to your wedding tables, consider handcrafting your own table runners. You'll save money while adding a personal flair to your décor. Choose fabrics that complement your color scheme and theme, like burlap for rustic weddings or satin for formal affairs. With basic sewing skills or even fabric glue, you can create stunning runners that'll impress your guests.
To make your handcrafted table runners stand out, try these creative ideas:
- Incorporate lace overlays for a romantic touch
- Add hand-stamped designs or patterns using fabric paint
- Embroider meaningful quotes or your wedding date
- Attach ribbons or tassels to the ends for extra flair
- Use fabric markers to create a guest book runner
Don't forget to measure your tables accurately before starting. You'll want your runners to hang gracefully over the edges without being too long.
If you're not confident in your crafting abilities, enlist the help of creative friends or family members. They'll likely be thrilled to contribute to your special day.
With a little effort and imagination, you'll have unique, beautiful table runners that'll elevate your wedding décor without breaking the bank.
Embellished Champagne Flutes
Elevating your wedding toast goes beyond the table settings. Transform ordinary champagne flutes into stunning accessories that'll impress your guests without breaking the bank.
Start with inexpensive plain glass flutes from a dollar store or discount retailer. Use metallic paint pens to add personalized details like the couple's initials, wedding date, or delicate designs. For a touch of glamour, apply adhesive rhinestones or pearls around the base or stem of the glass.
Create a frosted effect by spraying the lower portion of the flute with glass etching cream, then adding a ribbon or twine bow for a rustic charm. Alternatively, dip the stems in glitter for a sparkly finish.
For a nature-inspired look, wrap thin copper wire around the stem and add small silk flowers or leaves. If you're feeling artistic, use glass paint to create ombré effects or intricate patterns.
Don't forget to seal your creations with a clear, food-safe sealant to guarantee durability. These DIY embellished champagne flutes won't only serve as beautiful toast vessels but also double as memorable wedding favors for your guests to take home.
Frequently Asked Questions
How Can I Personalize Wedding Accessories Without Spending Too Much?
You can personalize wedding accessories affordably by adding DIY touches. Try embroidering initials on handkerchiefs, painting mason jars for centerpieces, or creating custom photo frames. Thrift stores offer unique items you can repurpose with a little creativity.
What Are Some Last-Minute Budget-Friendly Wedding Decor Ideas?
You can create stunning last-minute wedding decor on a budget. Use fairy lights, DIY paper flowers, or repurpose household items as centerpieces. Don't forget candles, ribbons, and balloons. Thrift stores often have hidden gems for unique touches.
Are There Any Eco-Friendly Alternatives to Traditional Wedding Accessories?
You've got eco-friendly options for wedding accessories! Try renting items, using potted plants instead of cut flowers, opting for digital invitations, and choosing biodegradable confetti. You can also repurpose family heirlooms or thrift store finds for unique touches.
How Can I Coordinate DIY Accessories With My Wedding's Color Scheme?
You can easily coordinate DIY accessories with your wedding colors by using fabric dye, paint, or colored ribbon. Choose materials that match your palette and incorporate them into centerpieces, bouquets, and decorations. Don't forget to use complementary shades for balance.
What Tools or Skills Are Necessary for Creating These Wedding Accessory Hacks?
You'll need basic crafting skills and tools like scissors, glue guns, and pliers. Don't worry if you're not an expert; many DIY wedding accessories require minimal skill. YouTube tutorials can help you learn specific techniques you'll need.
In Summary
You've now got a treasure trove of budget-friendly wedding hacks at your fingertips. With these clever ideas, you'll create a stunning, personalized celebration without breaking the bank. Remember, it's the thoughtful details that make your day special, not the price tag. So get creative, have fun with DIY projects, and watch your dream wedding come to life. Your guests will be impressed, and you'll love the money you've saved.

I’m Sarah, the creator and writer behind this site. I’m a wife and a mother of two wonderful kids who keep me on my toes and inspire me daily. My passion lies in creating and organizing memorable events and group activities, where people can come together and make lasting memories.

Leave a Reply