For your rustic outdoor wedding, you'll find plenty of budget-friendly arch options. Consider repurposing barn doors or ladders for a charming backdrop. Collect branches and wildflowers to create a natural, whimsical arch. Try macramé for a boho touch, or upcycle old window frames for vintage appeal. Hoop arches offer elegant simplicity, while driftwood brings beachy vibes. Copper pipes can add industrial chic, and fabric-draped A-frames create a romantic atmosphere. Don't forget the power of greenery and florals to enhance any arch design. With these creative ideas, you'll discover endless possibilities to craft your perfect wedding backdrop.
Repurposed Barn Door Arch
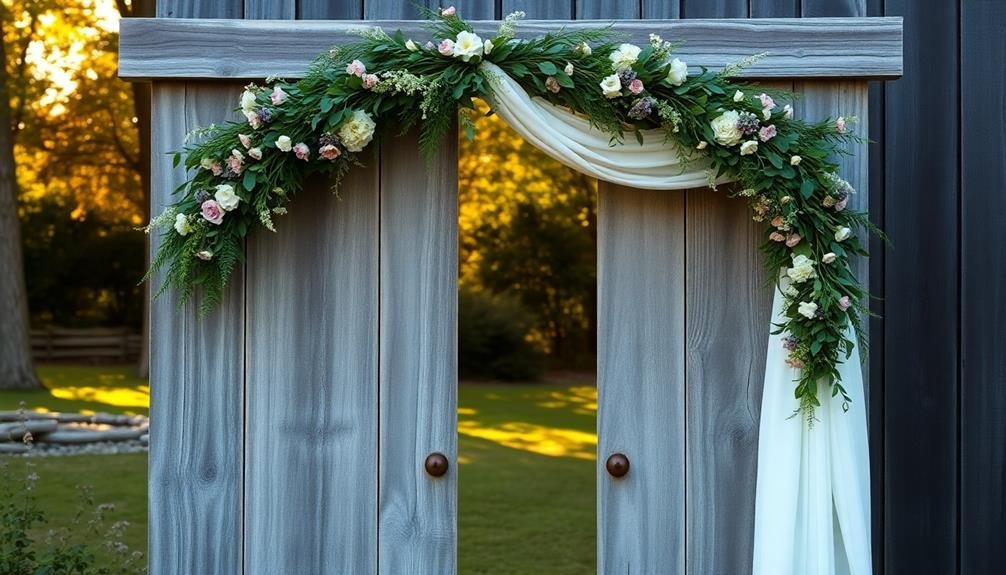
One stunning and budget-friendly wedding arch idea is the repurposed barn door arch. This rustic centerpiece can add a touch of vintage charm to your outdoor wedding ceremony.
To create this unique arch, you'll need to source an old barn door, which you can often find at salvage yards, antique stores, or online marketplaces. Once you've acquired the door, give it a thorough cleaning and decide if you want to keep its weathered look or refinish it to match your wedding colors.
You can then secure the door upright using sturdy support beams or by attaching it to an existing frame. To enhance the arch's appeal, consider adding floral arrangements, draped fabric, or string lights.
For a more elaborate design, you might use two barn doors positioned at an angle to create an A-frame structure. This setup provides more space for decorations and can frame the couple beautifully during the ceremony.
Don't forget to verify the arch is stable and safe, especially if you're setting it up outdoors where wind might be a factor. With some creativity and DIY spirit, a repurposed barn door arch can become a stunning focal point for your rustic wedding.
Ladder Love
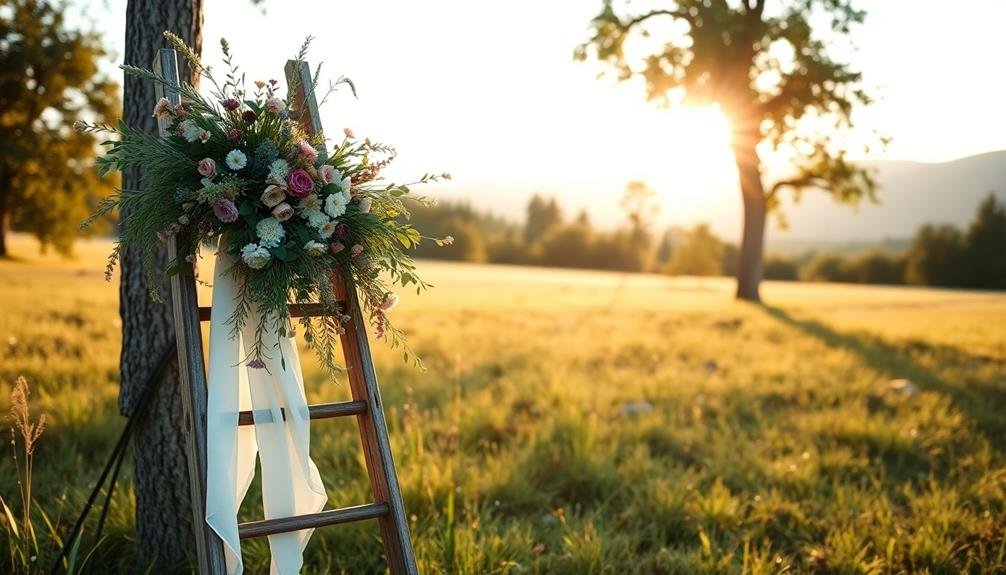
Another inventive way to create a unique wedding arch is by using ladders. You'll find that old wooden ladders can be transformed into a charming rustic backdrop for your vows.
Start by sourcing two matching ladders from thrift stores, garage sales, or your own shed. Clean them up and sand them down if needed, but don't worry about perfection – a bit of weathering adds character.
Position the ladders in an A-frame shape, securing them at the top with rope or decorative chains. To add stability, use stakes or weights at the base.
Now, it's time to decorate. Drape fabric or lace between the rungs for a softer look. Hang mason jars filled with flowers or LED candles from the steps. Weave ivy or fairy lights through the ladder for a magical touch.
For a personalized element, hang framed photos of you and your partner on the rungs. You can also attach wooden signs with meaningful quotes or your names.
Don't forget to take into account the ladder's height when planning your decorations, ensuring everything is visible and balanced.
Branches and Wildflowers
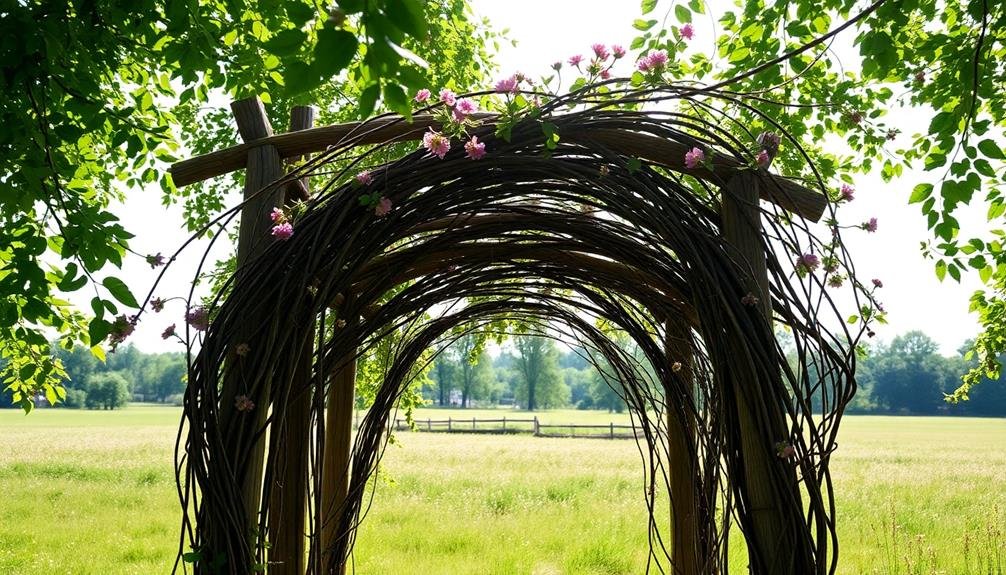
For a truly organic and whimsical wedding arch, consider using branches and wildflowers. This natural approach not only saves money but also creates a stunning backdrop for your ceremony.
Start by collecting sturdy branches from your local area or asking friends with wooded property for donations. Arrange them in an arch shape, securing them with twine or wire. Then, add a variety of wildflowers and greenery to bring color and texture to your creation.
To make your branch and wildflower arch even more special, try these ideas:
- Incorporate flowers that match your wedding colors
- Add fairy lights for a magical evening glow
- Hang small ornaments or crystals for a touch of sparkle
- Weave in ribbons or fabric that complement your theme
- Include meaningful items like family heirlooms or mementos
Remember to gather your flowers close to the wedding day to guarantee they stay fresh. If you're worried about wilting, consider using silk flowers mixed with real greenery for a similar effect.
This DIY approach allows you to customize your arch to fit your vision while keeping costs down. With a little creativity and effort, you'll have a unique and beautiful focal point for your rustic outdoor wedding.
Macramé Magic
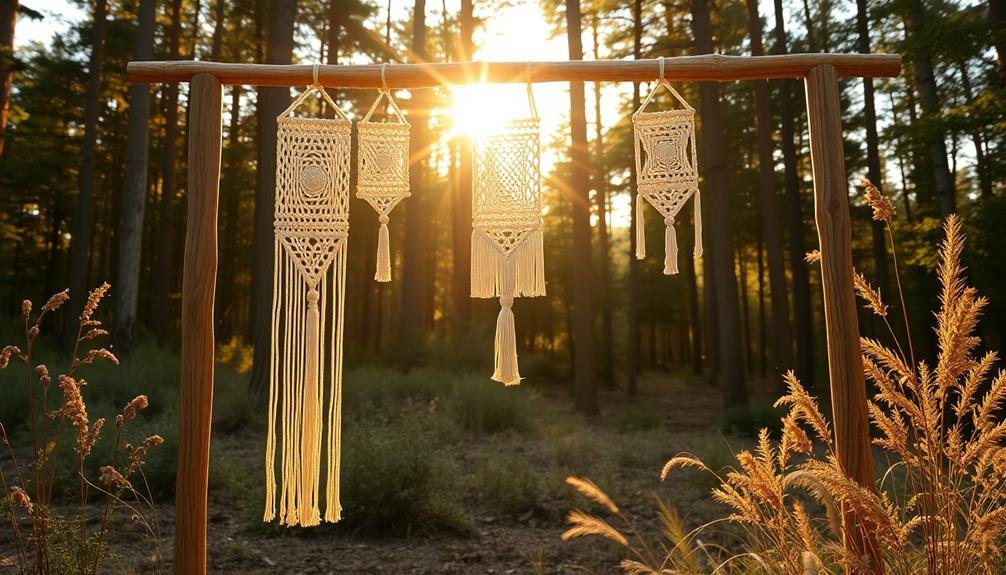
You can bring bohemian elegance to your wedding without breaking the bank by crafting a macramé arch.
This DIY project allows you to create a stunning focal point for your ceremony while expressing your artistic side.
With some rope, a few simple knots, and a bit of patience, you'll have a unique and budget-friendly wedding arch that perfectly captures the free-spirited vibe you're after.
Bohemian Elegance on Budget
Macramé, the bohemian bride's best friend, offers a stunning yet affordable option for wedding arches. You'll love how this versatile craft can transform simple materials into intricate designs that perfectly complement your rustic outdoor wedding.
With just a few ropes and some basic knot-tying techniques, you can create a one-of-a-kind arch that exudes bohemian elegance without breaking the bank.
To achieve this look on a budget, consider:
- Using natural cotton rope for an eco-friendly and cost-effective material
- Incorporating dried flowers or foliage for added texture and color
- Mixing in wooden beads or crystals for a touch of sparkle
- Adding tassels or fringe for extra boho flair
- Suspending the macramé from a simple wooden frame or existing structure
Don't be afraid to get creative with your design. You can opt for a full macramé curtain or create a more delicate, lacy pattern.
If you're feeling crafty, try your hand at making the arch yourself. There are plenty of online tutorials and kits available to guide you through the process.
Alternatively, you can find talented artisans on platforms like Etsy who offer custom macramé arches at reasonable prices.
DIY Macramé Arch Tutorial
Creating your own macramé wedding arch can be a rewarding and cost-effective DIY project. You'll need sturdy cotton rope, a wooden dowel or branch, scissors, and a measuring tape.
Begin by cutting your rope into equal lengths, allowing extra for knotting. Secure the dowel to a stable surface and start attaching your rope pieces using larks head knots.
Work in sections, creating patterns with square knots, spiral knots, and half-hitch knots. Incorporate decorative elements like wooden beads or crystals as you go. Vary your knot spacing to achieve a balanced look. Remember to step back occasionally to assess your progress and make adjustments.
As you near the bottom, gradually taper your design for a flowing effect. Trim excess rope and unravel the ends for a bohemian fringe. For added stability, consider attaching your macramé to a freestanding arch frame.
Personalize your arch with dried flowers, eucalyptus sprigs, or fairy lights. With patience and creativity, you'll craft a unique, budget-friendly wedding arch that perfectly captures your style and adds a touch of handmade charm to your special day.
Upcycled Window Frames
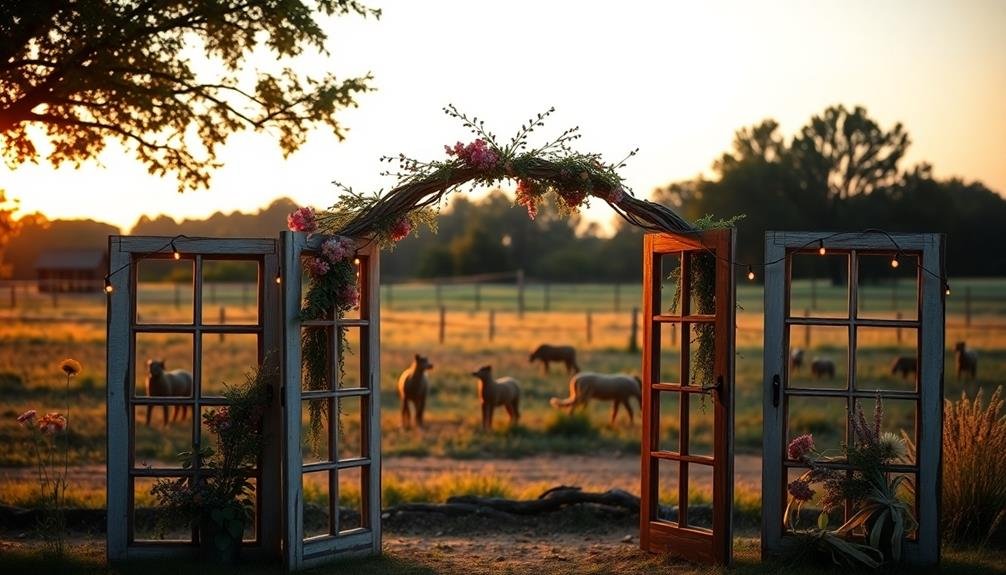
Transform old window frames into a stunning wedding arch that exudes vintage charm and elegance.
You'll love how easy it's to paint and decorate these frames to match your wedding theme.
Vintage Charm and Elegance
With a nod to the past, upcycled window frames offer a charming and elegant solution for budget-conscious couples.
These vintage pieces can be transformed into stunning wedding arches that blend rustic appeal with timeless sophistication. You'll find that repurposing old windows not only saves money but also adds a unique touch to your outdoor ceremony.
To create your vintage window arch, consider these ideas:
- Paint the frames in your wedding colors for a cohesive look
- Hang delicate lace curtains or sheer fabric for added romance
- Attach floral arrangements or greenery to frame corners
- Incorporate string lights for a magical evening ambiance
- Use multiple window frames to create a larger, more dramatic arch
DIY Painting and Decoration
Once you've sourced your vintage window frames, it's time to roll up your sleeves and get creative. Start by cleaning the frames thoroughly, removing any old paint or rust. Choose a color scheme that complements your wedding theme, and apply a fresh coat of paint or stain to the frames. Don't forget to weatherproof them if you're planning an outdoor ceremony.
Next, focus on decorating the window panes. You can use:
| Decorative Element | Effect | Emotion |
|---|---|---|
| Pressed flowers | Romantic | Nostalgia |
| Calligraphy quotes | Personal | Love |
| Lace curtains | Delicate | Elegance |
| Family photos | Sentimental | Joy |
| Fairy lights | Magical | Wonder |
Consider adding hanging elements like dried flowers, ribbons, or crystal beads to create a cascading effect. For a finishing touch, wrap vines or greenery around the frame edges. Remember, the key is to balance aesthetics with durability, ensuring your DIY arch can withstand outdoor conditions. By putting your personal touch on these upcycled window frames, you'll create a unique and memorable backdrop for your special day without breaking the bank.
Frame Placement Techniques
Arranging your upcycled window frames is essential for creating a stunning wedding arch. You'll want to reflect on both aesthetics and stability when placing your frames.
Start by laying out your frames on the ground to visualize the final structure. Experiment with different configurations until you find one that's visually appealing and structurally sound.
Once you've settled on a design, it's time to secure the frames. You can use sturdy rope or wire to tie the frames together at the corners. For added stability, contemplate driving stakes into the ground and attaching the frames to them. If you're working on a hard surface, use weighted bases to keep the arch in place.
Here are some frame placement techniques to reflect on:
- Staggered: Overlap frames at different heights for a dynamic look
- Symmetrical: Create a balanced arch with matching frame sizes on each side
- Asymmetrical: Mix and match frame sizes for a more eclectic feel
- Layered: Stack frames in front of each other for added depth
- Angled: Tilt frames slightly for a unique, artistic touch
Remember to leave enough space for you and your partner to stand comfortably under the arch during the ceremony.
With these techniques, you'll create a one-of-a-kind wedding arch that's both beautiful and budget-friendly.
Birch Tree Beauty
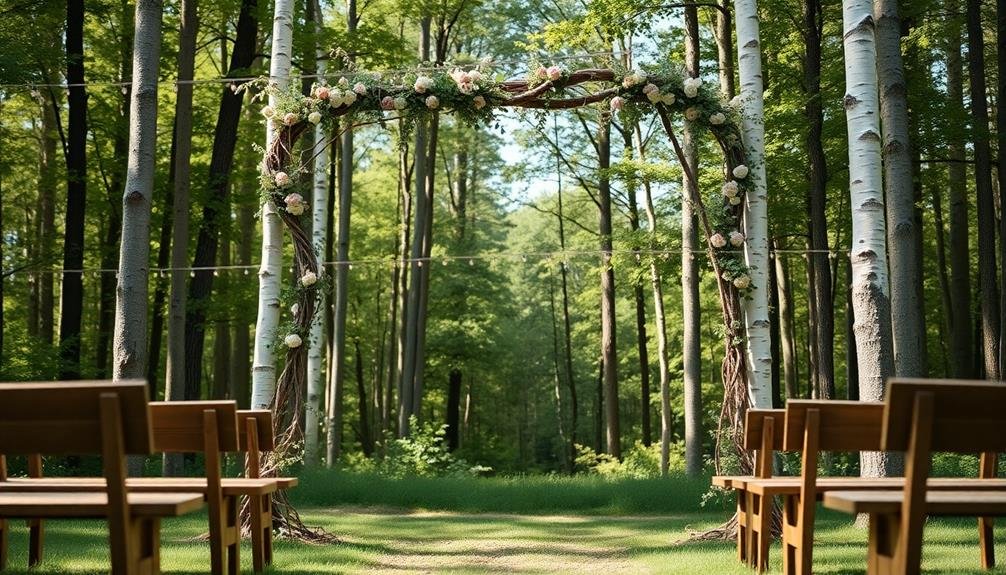
Birch trees offer a stunning, natural backdrop for your wedding ceremony. Their white bark and delicate leaves create an elegant, rustic atmosphere that's perfect for outdoor weddings.
To incorporate birch into your wedding arch, you don't need to break the bank. Start by sourcing birch logs or branches from local forests or tree services. Often, you can get these for free or at a low cost.
Select straight, sturdy pieces of varying heights to create an asymmetrical look. Clean the bark gently with a soft brush to remove dirt and debris.
Arrange the birch logs in a simple arch shape, securing them with twine or hidden screws. For added stability, bury the base of the logs slightly in the ground or use sturdy planters filled with rocks.
Enhance the natural beauty of the birch by draping sheer fabric or garlands of greenery between the logs.
To personalize your birch arch, hang small lanterns, mason jars with flowers, or wooden signs with your initials or wedding date. These simple additions will create a charming focal point for your ceremony without overshadowing the natural beauty of the birch.
Hoop Dreams
You'll love the simple yet elegant design of hoop arches for your wedding ceremony.
These versatile structures allow for countless floral arrangement possibilities, from minimal greenery to lush blooms covering the entire hoop.
With easy DIY assembly, you can create a stunning focal point for your vows without breaking the bank.
Simple yet Elegant Design
Many couples are drawn to the simple elegance of a circular wedding arch, often called a "hoop arch" or "moon gate." This striking design features a large metal or wooden hoop, typically ranging from 6 to 8 feet in diameter.
You'll find that this minimalist structure offers a perfect backdrop for your vows while maintaining a modern, sophisticated look.
To create your own hoop arch, consider these budget-friendly ideas:
- Use a large hula hoop as the base, spray-painted in your chosen color
- Craft the hoop from bendable PVC pipe for a lightweight, portable option
- Repurpose an old bicycle wheel for a rustic, upcycled look
- Create a wooden hoop using thin plywood strips soaked in water and bent into shape
- Find a local metal fabricator to weld a custom hoop for a more polished appearance
Once you've chosen your hoop, enhance its beauty with simple decorations.
Drape flowing fabric, attach fresh or faux greenery, or adorn it with delicate fairy lights. Remember, the key to this design is its simplicity, so don't overdo the embellishments.
With a hoop arch, you'll create a stunning focal point for your ceremony without breaking the bank.
Versatile Floral Arrangements
Building on the simplicity of the hoop arch, floral arrangements offer endless possibilities for personalization and style. You can create a stunning focal point for your ceremony without breaking the bank. Start by choosing seasonal flowers that are readily available and cost-effective. Mix and match different blooms, textures, and colors to achieve your desired look.
For a rustic outdoor wedding, consider incorporating wildflowers, baby's breath, and greenery. These elements add a natural, whimsical touch to your arch. You can create asymmetrical arrangements by clustering flowers at the base or top of the hoop, or opt for a more balanced look with evenly distributed blooms.
Don't forget to include foliage like eucalyptus, ivy, or ferns to add depth and dimension to your floral design. You can also incorporate non-floral elements like burlap, twine, or ribbon to enhance the rustic feel.
If you're crafty, consider making your own floral arrangements using artificial flowers, which can be prepared in advance and reused after the wedding.
Easy DIY Assembly
Crafting a DIY hoop arch is simpler than you might think. With a few basic materials and tools, you can create a stunning focal point for your rustic outdoor wedding. Start by selecting a large hoop, which you can find at craft stores or online. Metal, wood, or even repurposed barrel rings work well for this project.
To assemble your hoop arch, you'll need:
- A large hoop (metal, wood, or barrel ring)
- Two sturdy poles or posts
- Floral wire or zip ties
- Decorative elements (flowers, greenery, fabric)
- Basic tools (pliers, wire cutters, scissors)
Secure the hoop to the poles using floral wire or zip ties, ensuring it's firmly attached. Place the poles in the ground or use weighted bases for stability.
Now comes the fun part – decorating your arch! Wrap greenery around the hoop, securing it with wire. Add flowers, fabric, or other elements to match your wedding theme.
Don't be afraid to get creative and personalize your arch. With a little effort, you'll have a unique, budget-friendly wedding arch that perfectly complements your rustic outdoor celebration.
Driftwood Delight
For a naturally elegant and beachy vibe, driftwood can transform your wedding arch into a stunning focal point. You'll love how this versatile material brings a touch of the ocean to your ceremony, regardless of your venue's location. To create a driftwood arch, you'll need to collect various pieces of driftwood and fasten them together using sturdy wire or twine.
Here's a quick guide to help you choose and arrange your driftwood:
| Size | Shape | Placement |
|---|---|---|
| Large | Curved | Framework |
| Medium | Straight | Support |
| Small | Twisted | Accents |
| Varied | Branched | Filler |
Once you've assembled your arch, consider adding some simple embellishments to enhance its beauty. White fairy lights can create a magical glow, while delicate seashells or starfish can emphasize the coastal theme. For a softer look, drape sheer fabric between the driftwood pieces or weave in some dried sea grass.
Remember to fasten your arch properly, especially if you're having an outdoor ceremony. Use sturdy stakes or weights to guarantee it remains upright throughout your special day. With a bit of creativity and effort, you'll have a unique, budget-friendly wedding arch that perfectly captures the essence of a rustic beach wedding.
Copper Pipe Perfection
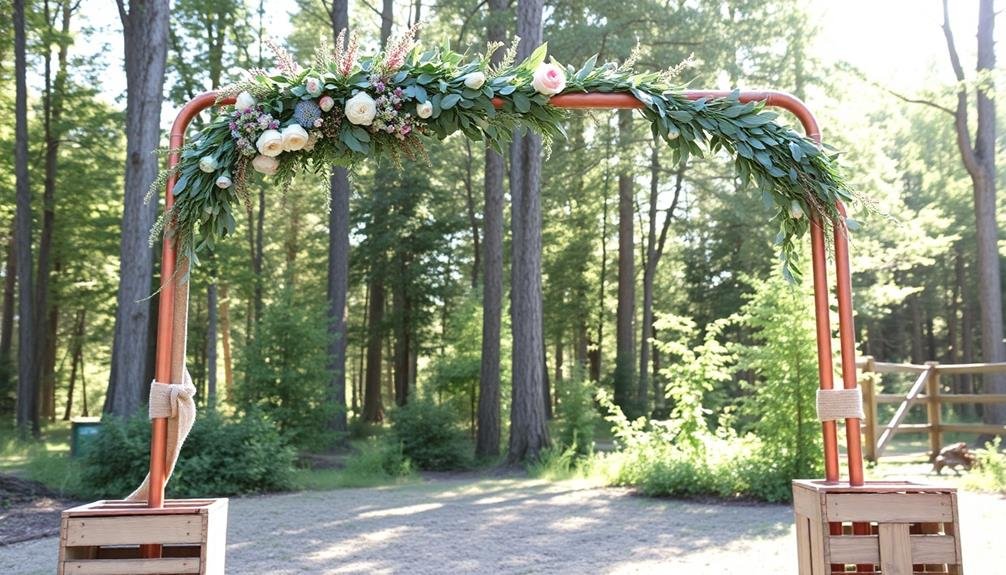
Sleek and industrial, copper pipe arches offer a modern twist on traditional wedding decor. You'll love how the warm metallic tones complement rustic outdoor settings while adding a touch of contemporary elegance.
Creating a copper pipe arch is surprisingly simple and cost-effective, making it an ideal DIY project for budget-conscious couples.
To build your copper pipe arch, you'll need:
- Copper pipes and fittings
- Pipe cutter
- Sandpaper
- Copper polish
- Epoxy or strong adhesive
Start by designing your arch's shape and measuring the required pipe lengths. Cut the pipes to size, sand the edges, and polish them for a gleaming finish. Assemble the structure using fittings and secure with epoxy.
For added stability, create a sturdy base using larger diameter pipes or concrete-filled planters.
Enhance your copper arch with greenery, flowers, or fabric drapes. LED string lights wrapped around the pipes create a magical glow for evening ceremonies.
You can also incorporate copper elements in other wedding decor, such as centerpieces or signage, for a cohesive look. With its versatility and affordability, a copper pipe arch is sure to make a statement at your rustic outdoor wedding.
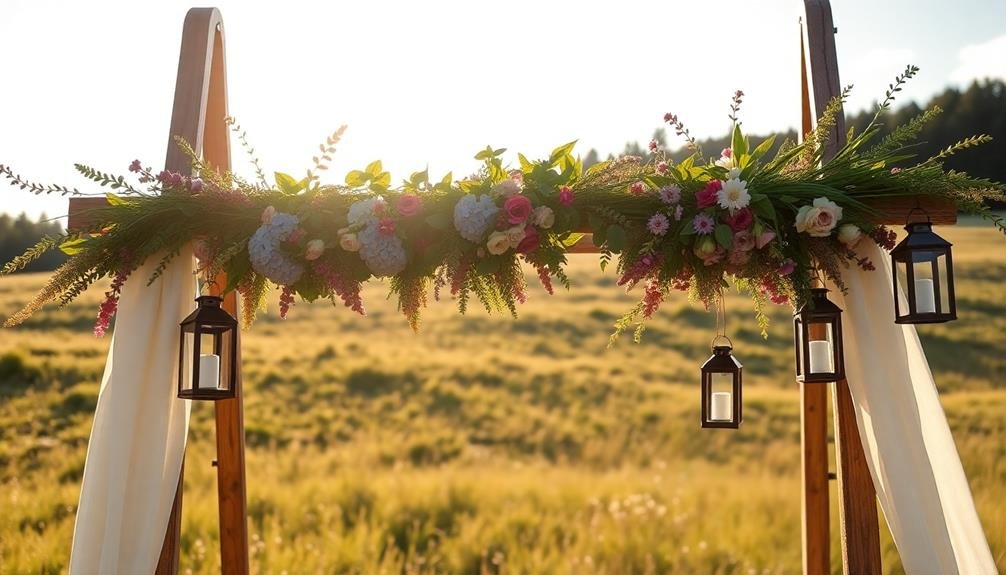
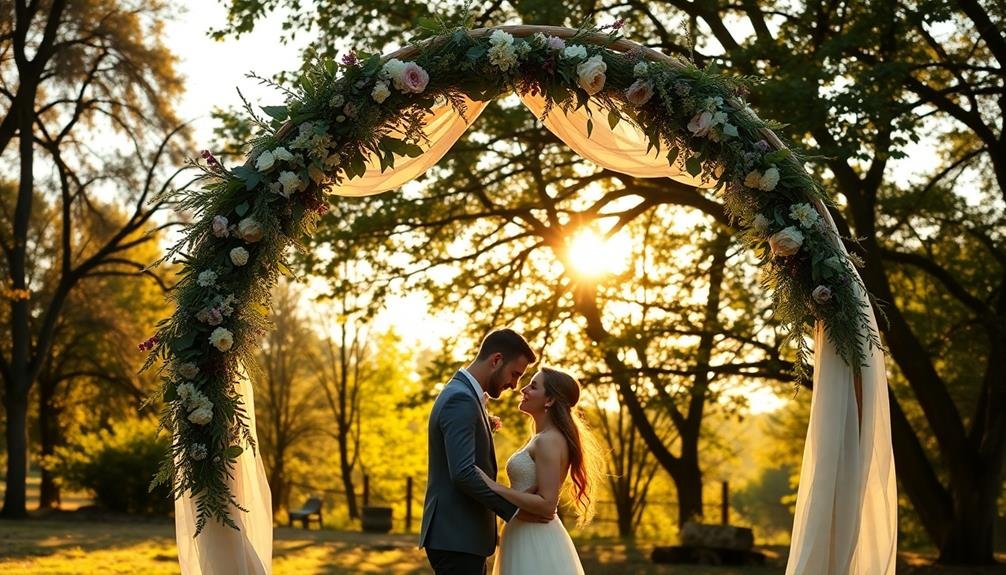
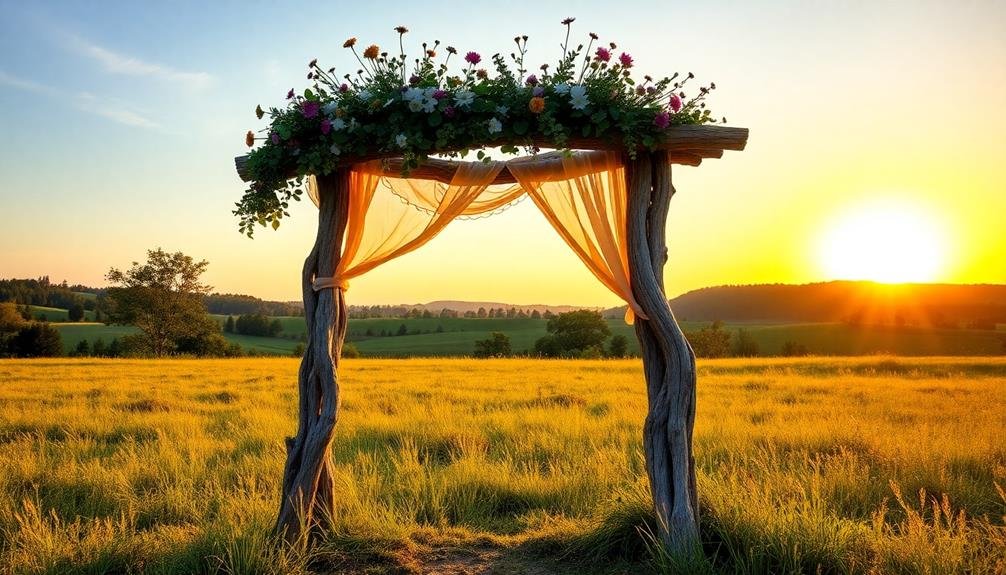
Fabric-Draped A-Frame
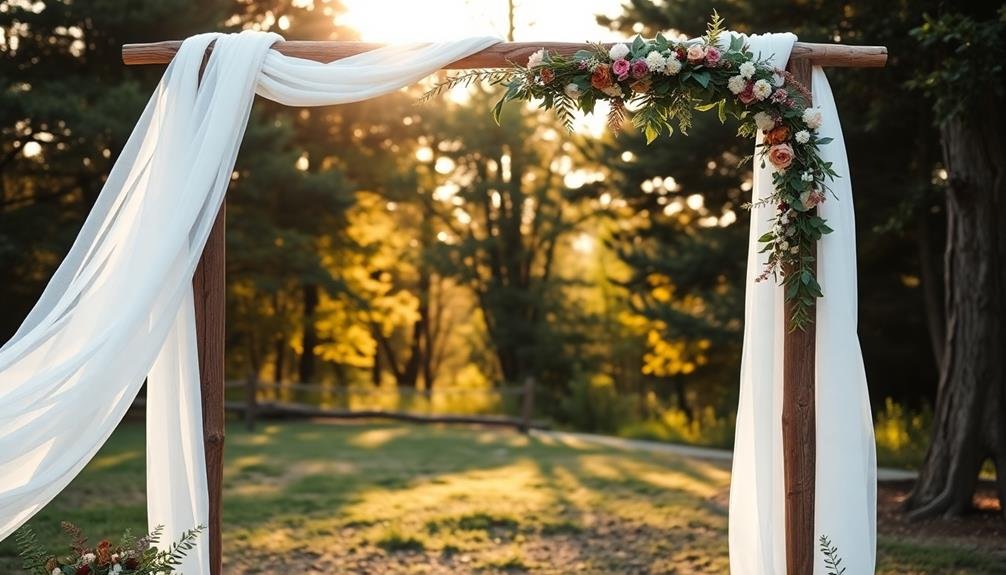
A fabric-draped A-frame arch frequently offers a romantic and ethereal backdrop for wedding ceremonies. You'll find this style both versatile and budget-friendly, as it can be easily customized to match your wedding theme. To create an A-frame arch, simply use two tall ladder-style structures or wooden beams leaned against each other to form an "A" shape.
Once you've set up the frame, drape your chosen fabric over it. Lightweight materials like chiffon, tulle, or gauze work best for a flowing, dreamy effect. You can secure the fabric with pins, ties, or even floral wire for a more polished look. Consider adding some personal touches to make your arch unique:
| Decorative Elements | Color Options | Placement Ideas |
|---|---|---|
| Fairy Lights | Warm White | Intertwined |
| Floral Garlands | Pastel Mix | Asymmetrical |
| Greenery Swags | Deep Green | Top-heavy |
| Ribbon Streamers | Ombre Tones | Cascading |
| Macramé Accents | Natural Beige | Centered |
Frequently Asked Questions
How Much Weight Can a DIY Wedding Arch Typically Support?
You'll find that a typical DIY wedding arch can support 10-20 pounds safely. However, it's essential to take into account your specific design, materials, and construction methods. Always test your arch's stability before the big day.
What Tools Are Necessary for Constructing a Homemade Wedding Arch?
You'll need a saw, drill, measuring tape, and screwdriver to build a wedding arch. Don't forget safety gear like gloves and goggles. For stability, you'll want a level and possibly concrete for anchoring the arch.
How Far in Advance Should the Wedding Arch Be Set Up?
You'll want to set up your wedding arch 1-2 days before the ceremony. If it's lightweight, you can assemble it the morning of. For heavier structures, install them earlier to guarantee stability and make any necessary adjustments.
Are Permits Required for Erecting a Temporary Wedding Arch Outdoors?
You'll often need permits for outdoor structures, even temporary ones. Check with local authorities before erecting your wedding arch. Requirements vary by location, so don't assume you're exempt. It's best to secure any necessary permissions well in advance.
How Do You Transport a Large Wedding Arch to the Venue?
You'll need to disassemble the arch for transport if it's large. Rent a truck or trailer to move the pieces. Wrap fragile parts carefully. Bring tools for reassembly. Consider hiring professionals if it's particularly complex.
In Summary
You've got plenty of options to create a beautiful, budget-friendly wedding arch for your rustic outdoor ceremony. Don't be afraid to get creative and use what's available around you. Whether you're repurposing old doors, crafting with branches, or draping fabric, your DIY arch will add a personal touch to your special day. Remember, it's not about spending a fortune; it's about creating a meaningful backdrop for your love story.

I’m Sarah, the creator and writer behind this site. I’m a wife and a mother of two wonderful kids who keep me on my toes and inspire me daily. My passion lies in creating and organizing memorable events and group activities, where people can come together and make lasting memories.

Leave a Reply